Friday, 31 July 2015

Bread Sticks

Bread Sticks :

Bread is a staple food prepared from a dough of flour and water, usually by baking. Throughout recorded history it has been popular around the world and is one of the oldest artificial foods, having been of importance since the dawn of agriculture.
There are many combinations and proportions of types of flour and other ingredients, and also of different traditional recipes and modes of preparation of bread. As a result, there are wide varieties of types, shapes, sizes, and textures of breads in various regions. Bread may be leavened by many different processes. Many non-cereal ingredients may be included, ranging from fruits and nuts to various fats. The origin of Bread dates to the European countries. Now we are going to cook a snack variety with bread.


                                     Bread Sticks recipe
Recipe Cuisine: European  |  Recipe Category:Snack
Prep Time:5 mins    |  Cook time: 10mins     |  Serves: 2

Ingredients


Bread - 4 slices

Cheese slices - 2 nos

Oil - 1 scoop
_____________________________________________________________________________________

Method:

  • First take 2 slices of bread.
  •  Remove its 4 outlines. Now roll it well using a pin roller. Roll it flat, Always use fresh bread else it will not form into shape.
  • After rolling it into a flat surface, place 1 cheese slice at the centre. The cheese slice can be cut into a smaller square to prevent flowing of cheese on heating. Pin the roll with a small bamboo stick to maintain the shape.
  • Take a tawa and pour oil and shallow fry the sticks. Fry it into golden colour on all sides.
  • Now the Bread sticks are ready to be served with any sauce.

Thursday, 30 July 2015

Bread Omlette

Bread Omlette (பிரட் அம்லேட்):
 In cuisine, an omelette is a dish made from beaten eggs quickly cooked with butter or oil in a frying pan. It is quite common for the omelette to be folded around a filling such as cheese, chives, vegetables, meat (often ham), or some combination of the above. 
The fluffy omelette is a refined version of an ancient food. According to Alan Davidson, the French word omelette came into use during the mid-16th century. Omlette's origin rates to France.
An Indian omelette, often called a Masala omelette, is usually made with the addition of spices, which vary by region. Those most commonly used are finely chopped green chilies, chopped onions, coriander leaf or powder, cumin and a pinch of turmeric, all of which are added to the egg before it is whisked.
Now we are going to see Bread Omlette which is a famous street food in Mumbai and aslo an easy breakfast.


                                Bread Omlette recipe
Recipe Cuisine: Indian  |  Recipe Category: Breakfast
Prep Time:5 mins    |  Cook time: 10mins     |  Serves: 2

Ingredients


Bread - 4 slices

Eggs - 4 nos

Tomatoes - 1/2 no

Salt - as needed

Turmeric powder -1 pinch

Chilly Powder (dhaniya powder mixed) - 1/4 tbsp

Onion - 1/2 no

Cilantro leaves- needed

Pepper Powder - 1/4 tsp

Green chilly -1 no

_____________________________________________________________________________________

Method:

  • First chop the onions, tomatoes and chilly finely. In a bowl add the chilly powder, turmeric powder, pepper powder and salt and sprinkle water to mix all the powders evenly. Now add 2 eggs and beat them finely with a whisker.Now add the onions and tomatoes, chilly and cilantro leaves and give a good beat.
  •  Heat 1 spoon oil in a tawa and when its hot pour the beaten mixture into a big dosa shape. Always use a tawa to fit 2 bread slices. Spread the omlette on all sides.Now take a bread slice and touch its one side on the watery surface of the omlette and place it backwards on the omlette. Repeat the same with the second slice too. Keep the slices adjacent to eachother.
  • Remeber to place the touched surface facing the to (facing u)
  • Now place a laddle below the omlette , place it vertically to hold the 2 slices and turn the omlete upside down. The bread slices will be below now.
  • Once its cooked fold it into 2 and serve it with any dip or just plain. Take care when u turn it, dont break the omlette.

Wednesday, 29 July 2015

Mushroom Dry Roast

Mushroom Dry Roast (காளான் வறுவல்):

 A mushroom (or toadstool) is the fleshy, spore-bearing fruiting body of a fungus, typically produced above ground on soil or on its food source. The standard for the name "mushroom" is the cultivated white button mushroom, that have a stem (stipe), a cap (pileus), and gills (lamellae) on the underside of the cap. These gills produce microscopic spores that help the fungus spread across the ground or its occupant surface.

Mushrooms are used extensively in cooking, in many cuisines (notably Chinese, Korean, European, and Japanese). Though neither meat nor vegetable, mushrooms are known as the "meat" of the vegetable world. Most mushrooms sold in supermarkets have been commercially grown on mushroom farms. The most popular of these, Agaricus bisporus, is considered safe for most people to eat because it is grown in controlled, sterilized environments. Several varieties of A. bisporus are grown commercially, including whites, crimini, and portobello. 
Some mushrooms or extracts are used or studied as possible treatments for diseases, such as cardiovascular disorders. Some mushroom materials, including polysaccharides, glycoproteins and proteoglycans are under basic research for their potential to modulate immune system responses and inhibit tumor growth.
Now we are going to see a Dry Roast receipe with mushrooms.


                                Mushroom Dry Roast recipe
Recipe Cuisine: Indian  |  Recipe Category: Lunch
Prep Time:10 mins    |  Cook time: 15mins     |  Serves: 2

Ingredients


Mushroom - 250 gms (10 nos)

Tomatoes - 1 no

Salt - as needed

Turmeric powder -1/4 tbsp

Chilly Powder (dhaniya powder mixed) - 1 tsp

Onion - 1 no

Ginger Garlic Paste - 1/2 tsp

Cilantro leaves- needed

Pepper Powder - 1/4 tsp

------------------------------------------------------------------------------------------------------------------------

To Temper :


Oil - 1 tbsp

Mustard - 1/2tbsp

Urad dhall - 1/2tbsp

Curry leaves - 4 or 5

Red Chilly -1 no

_____________________________________________________________________________________

Method:

  • First cut the mushroom into heads and tails portions.
  •  Marinate the mushroom pieces with turmeric powder, chilly powder, pepper powder and salt and set aside maximum for 30mins.
  • Chop the tomatoes and onions vertically.
  • In a pan add oil and add the ingredients in the temper table to it. Add chopped onions and fry well. Add ginger garlic paste and saute well. When its cooked well add the chopped tomatoes and saute well.
  • Now add the marinated mushrooms and roast well. Sprinkle water and allow it to get cooked with lid closed. Mushroom will leave water which is enough for the roast.
  • Serve it hot garnished with cilantro leaves. It goes well with Rasam / Sambhar/ variety rice /curd rice.

Tuesday, 28 July 2015

Mutton Sukka Fry

Mutton Sukka Fry (மட்டன் சுக்கா வறுவல்):

 Lamb and mutton are terms for the meat of domestic sheep  at different ages. A sheep in its first year is called a lamb; and its meat is also called lamb. The meat of a juvenile sheep older than one year is hogget; outside North America this is also a term for the living animal. The meat of an adult sheep is mutton, a term only used for the meat, not the living animals.

Meat from sheep features prominently in several cuisines of the Mediterranean. Lamb and mutton are very popular in Central Asia and in certain parts of China, where other red meats may be eschewed for religious or economic reasons. It is also very popular in Australia. Barbecued mutton is also a specialty in some areas of the United States  and Canada. There are almost thousand receipes with mutton, Now we are going to see a South Indian Mutton Sukka Fry.


                                   Mutton Sukka Fry recipe
Recipe Cuisine: Indian  |  Recipe Category: Lunch
Prep Time:10 mins    |  Cook time: 30 mins     |  Serves: 3

Ingredients


Mutton - 1 kg

Tomatoes - 1.5 nos

Green chilly-1 no

Salt - as needed

Turmeric powder -1/4 tbsp

Chilly Powder (dhaniya powder mixed) - 1 tsp

Onion - 1 1/2 nos

Ginger Garlic Paste - 1 tsp

Ground Pepper Powder - 1 tsp

Cilantro leaves- needed

Pudina /mint leaves - handfull

------------------------------------------------------------------------------------------------------------------------

To Temper :


Oil - 1 tbsp

Fennel -1 tsp

Cinnamon - 1 small piece

Star anise - 1 no

Eliachi - 1 no

Cloves - 3 nos

Curry leaves - 4 or 5

Black cardamon - 1 no


-------------------------------------------------------------------------------------------------------------------------

                                                     To Boil the Mutton :


Ginger Garlic paste - 1 tsp

Chilly powder( dhaniya pow mixed) - 1 tsp

Turmeric powder - 1/4 tbsp

Curd - 2 tsp

Salt - needed

_____________________________________________________________________________________

Method:

  • First chop the mutton into small pieces only then sukka fry will be tasty. Pressure cook the mutton well for 4 to 5 whistles with the ingredients in the To Boil table. Curd is used to soften the meat.Keep it aside. Incase its sheep (European countries ) cook for 10 whistles and discard the stock. As the stock will be very oily.
  • Pour oil in a kadai and add the ingredients in the temper table.
  • And when it splutters add the green chilly (slit vertically), pudina leaves , onions, and ginger garlic paste and saute well.
  • Add the chopped tomatoes and saute well. Now add the turmeric powder, chilly powder and saute well. Now add the boiled mutton pieces and mix well.
  • Add 1/4 cup water and allow it boil well with lid closed. When it done add coarsely ground pepper and cilantro leaves and mix it for 2 mins and switch off the flame. 
  • Serve with sambhar or any variety rice or rasam .

Monday, 27 July 2015

Rice flour Murukku

Murukku (முறுக்கு):

Murukku is a savoury, crunchy Indian snack. The snack originated in the Tamil Nadu state, and its name derives from the Tamil word for "twisted" which refers to its shape. Murukku is popular all over India, and also in other countries where Tamil diaspora is present: Sri Lanka, Singapore and Malaysia.
Murukku is typically made from rice flour and urad dal flour. It is sometimes called "chakli"; (typically made with an additional ingredient, bengal gram (chickpea) flour).
The dish has many variations, resulting from the types and proportions of flours used. The Kai Murukku is made by hand using a stiffer dough. Pakoda murukku is another ribbon-shaped variety of the snack. Manapparai, a town in Tamil Nadu, is known for its unique variety of murukkus, known as Manapparai murukku.
Other varieties include:
Rice and lentil murukku (Mullu murukku)
Light crispy murukku (Thenkuzhal murukku)
Coconut milk murukku (Thengai paal murukku)
Wheat flour murukku (Godhumai murukku)
Spicy murukku (Kaara murukku)
Garlic murukku (Poondu murukku)
Ring muruku
Butter murukku (Vennai murukku)
Besan Murukku
Rice murukku (Arisi murukku)
Sweet murukku (Achu murukku or Achappam)


                                       Murukku recipe
Recipe Cuisine: Indian  |  Recipe Category: Snack
Prep Time:15 mins    |  Cook time: 15 mins     |  Serves: 4

Ingredients


Rice flour - 2 cups

Roasted Urad dhall Flour - 1/2 cup

Butter - 2 tsp

Jeeragam - 1/2 tsp

Asafoetida/Hing - 1/4 tbsp

Salt- needed

Oil - to fry


------------------------------------------------------------------------------------------------------------------------

Method:

  • First You need to prepare the Rice flour.
  • Steps : 
1.Soak the rice for at least 2 hours and drain the water, spread it in a clean cloth or news paper to absorb the excess water.
2.Grind it to a fine powder in a mixer.
3.Sieve the flour(you can add the remaining coarse rice to the next batch grinding). Dont rub and sieve. Do it gently. 
4.Fry the urad dal flour until nice aroma comes and then grind it. Seive it gently.

  • I have used both store bought flours. Now take a bowl and add the flours, salt, asafoetida, jeera and melted butter and mix all the ingredients well. Now boil 2cups water in a pan and when it boils well add it to the mixture and mix well with a laddle.Add water slowly and keep mixing. You can also skip this step and add warm water. When we add hot water the flour doubles the quantity.
  • Mix well and roll it into a smooth dough once the dough becomes warm and bearable in your hands.
  • Now take a murukku press and apply oil on all surface and then add the dough little by little.
  • I usually grease a plastic sheets and press the murukku swirls. Dont worry about the shape. 
  • Now heat oil in a kadai and add the murukku slowly using your hands. Grease ur hands before u do it. Fry till they turn crisp and place them in a kitchen towel.
  • Once the oil is drained add it to an air tight container and store it. Close the lid after some time.
For kai murukku follow the same procedure but roll the dough into small balls(lemon sized). Pull out a string of dough from the ball and keep it as  base and keep swirling the rest of the ball dough gently with your hands. Keep a bottle cap and roll these  swirls sround it. I will post the pictures shortly.

Sunday, 26 July 2015

Avacado Egg Roll (Egg optional)

Avacado Egg Roll: (Egg optional)


Avocados are rich in monounsaturated fat, the heart-healthy kind. Yet scientists are now more interested in the active compounds in avocados that might help prevent cancer. One study found that those compounds can inhibit the growth of prostate cancer cells in the laboratory. While conducting the study, these researchers found avocados are loaded with a variety of antioxidants, including familiar disease-fighting compounds such as lutein, beta-carotene,& vitamin E.
Another benefit is that avocados help the body absorb phytochemicals from other foods. Researchers from Ohio State University reported that pairing avocados with salsa or salad allows for better absorption of antioxidants in those foods. The lycopene in tomatoes or the beta-carotene in carrots may be better absorbed if there's a slice or two of avocado in the bowl. 

Now I am going to show u the preparation of Avacado Egg Roll. Undoubtedly Avacado goes well with egg and meat.(chicken especially). Here egg is optional, Vegetarians kindly skip egg and follow the same.
                         

                                    Avacado Egg Roll recipe
Recipe Cuisine: European |  Recipe Category: Snack
Prep Time:15 mins    |  Cook time: 10 mins     |  Serves: 3


Ingredients:

                                                      
Avacado - 1/2

Onion - 1/2 chopped

Tomato - 1/2 chopped

Salt  - 1/4 tbsp

oil -to fry

Egg - 1no


Spring Roll sheet - needed
(maida flour, 1tsp Oil, Salt  in case sheet is not available)

Coriander leaves - little

Pepper - 1/4 tbsp

-----------------------------------------------------------------------------------------------------------------------
                                              

 Method:

  • First mash the avacado well with salt and pepper. Now add the finely chopped onions, tomatoes and coriander leaves to the avacado and mash finely.
  • Roll them into small balls.
  • If using Spring roll sheets keep them out of fridge to set to room temperature. Else mix maida flour , salt, oil in a bowl and make it into a soft dough. Roll them into small balls and spread them using a pin roller into a fine sheet. Cut sheet to a perfect square.
  • Now place the avacado ball in the sheet and fold it into a roll as shown below. Use flour paste to seal the edges. Roll it tightly but make sure the sheet does not get damaged. 
                                 
  • Now U need to fry the rolls in oil, beat 1 egg in a bowl and dip the roll into the egg and then to the oil. Incase of vegetarians this is optional, U can fry the rolls straight away.


  • Serve the rolls hot with your preferred dips.!!


Saturday, 25 July 2015

Kaara Kuzhambu (கார குழம்பு ): Puducherry Style

Kaara Kuzhambu (கார குழம்பு ): Puducherry Style

Kuzhambu is a dish common in South India and Sri Lankan Tamil cuisines, and is primarily made of a variety of dals. Kuzhambu is a gravy based on a broth made with tamarind, dhall, tomatoes and can include vegetables. The dish is very popular as a side for rice in the southern regions of India especially in Tamil Nadu, Karnataka and Kerala. The number of varieties of kuzhambu are countless, with each state in the South preparing it with a typical variation, adapted to its taste and environment.
Varieties of Kuzhambu

Vathal Kuzhambu- prepared using vathals, onion shallots
Milagu Kuzhambu - prepared using black pepper
Kara Kuzhambu - prepared using onion, green chili, tomatoes
Mor Kuzhambu- prepared using thick buttermilk, channa dal, ash gourd, okra, pumpkin
Poondu Kuzhambu- prepared using garlic
Vazhakai Kuzhambu- prepared using plantain
Vendakai Kuzhambu- prepared using okra
Poricha Kuzhambu- prepared using mixed vegetables, black pepper, ample amounts of dal


Here I am going to cook Kara kuzhambu of Puducherry style with onion vadagam. Vadagam is a ready-to-use blend of spices that is a French derivative. It is an Indian curry blend with added aromatics such as shallots and garlic. The spice blend is thought to have originated from French colonial influence in the Puducherry region of India.
Indian recipes for vadavam blends vary, but at a minimum most contain pounded onion, garlic, cumin seeds, mustard seeds and fenugreek. The mixture is dried in the sun and then crushed, mixed with castor oil, which has preservative properties, and rolled into balls, which are then dried for several more days.Similarly, occidental recipes for vadagam use onions, garlic, spices and oil, but the drying is done using an oven.
IMAGE DESCRIPTION

                                   Kara Kuzhambu recipe
Recipe Cuisine: Indian  |  Recipe Category: Lunch
Prep Time:10 mins    |  Cook time: 15 mins     |  Serves: 4

Ingredients

 Tamarind - 1 lemon sized

Tomatoes - 1.5 nos

Green chilly-1 no

Salt - as needed

Turmeric powder -1/4 tbsp

Chilly Powder (dhaniya powder mixed) - 1tsp

Sugar / jagerry - 1/4 tbsp

Small Onion shallots - 4 to 5 nos

Garlic -3 cloves

Curry leaves- 3 or 4 nos

------------------------------------------------------------------------------------------------------------------------

To Temper :


Oil - 1 tbsp

Vadagam - 1tsp


-------------------------------------------------------------------------------------------------------------------------

Method:

  • First chop the onion shallots and mince the garlic well. Soak the tamarind for 20mins and extract the pulp. Grind the tomatoes to a fine paste. In a bowl add salt, Turmeric powder, chilly powder and mix well. Now add the tamarind pulp and tomatoe pulp to it and mix well with your hands.
  • Now Take a vessel and heat it. Add oil and when it becomes hot add the 1tsp  vadagam and curry leaves. It gives a wonderfull aroma.
  • And when it splutters add the green chilly (slit vertically) , garlic and onions. 
  • When the onion turns pale add the liquid mixture in the bowl and mix it well with a laddle.

  • Allow the kuhambu to boil until the smell of the chilly powder vanishes and it forms into a thick consistency. Now add the sugar and mix it well.U can add boiled eggs to it when its boiling. If u like to add drumstick, saute the drumstick with the onion shallots and let it boil with sprinkled water. When the drumstick is half cooked add the liquid mixture in the bowl.
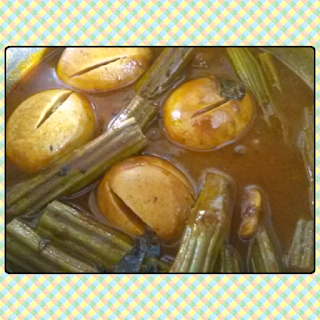
  • I always add boiled egg to this kuzhambu as I like the egg white changed into red colour of the kuzhambu. Pierce the eggs with vertical lines so that the kuzhambu enters the egg.

Friday, 24 July 2015

Aval Kesari (அவல் கேசரி):

Aval Kesari (அவல் கேசரி)

Kesari  is an Indian dessert that is popular throughout the country. It originated from the Karnataka. It is a Cuisine of Karnataka and is a popular dish during festivals such as Ugadi. The word kesari refers to the spice saffron which is used, resulting in its saffron-orange-yellow-colored tinge.Though it is a sweet dish, in Karnataka, it is prepared not only as a sweet dish but also for normal breakfasts.In North India it is served as a sweet dish called Sooji Halwa. There is a large choice of Kesari Bhath varying from place to place, depending on availability of products. It might be cooked with pineapple or banana, mango and rice. The classical ingredients used for its preparation are semolina, sugar, ghee, water and milk. For this Aadi second Friday I have prepared this sweet.


                                    Aval Kesari recipe
Recipe Cuisine: Indian  |  Recipe Category: Sweet
Prep Time:10 mins    |  Cook time: 15 mins     |  Serves: 2


Ingredients:

                                                      
Aval/Poha/Flattened rice - 1/2 cup

Water - 1 cup

Sugar - 1tsp less for 1/2 cup

Salt  - 1 pinch

Ghee/oil - 2tsp

Cashews, Raisins - as needed

Cardamon powder - 1 pinch

Food colour(yellow) - 1 pinch

Grated coconut (optional)-1 tsp

-----------------------------------------------------------------------------------------------------------------------
                                              

 Method:

  • First pour 1tsp ghee in a pan and fry the cashews and raisins and set aside. 


  • In the same pan fry the aval until it becomes crispy. The colour should not change, and let it cool. Now grind it coarsely.

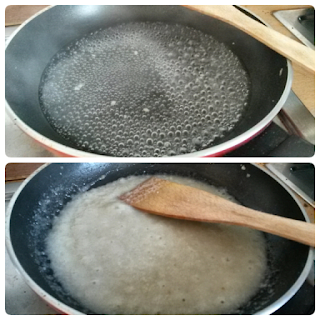
  • Now take a pan and pour the water and let it boil.When it boils well add the ground aval and mix well and let it get baked fully.


  • The aval will first be like a porridge and later turn into a non-sticky paste, wait until then. Keep mixing it with a laddle.

  • Now when all the water has been absorbed and it comes like a paste add the cardamon powder, food colour , grated coconut (optional), sugar and mix well.

  • The sugar will start to leave water and that is enough to mix the ingredients. Mix well until it forms into a halwa consistency. Add the remaining ghee around the pan so that it does not get stuck. Add the roasted cahewsand raisins and mix well.
  • Now transfer it into a cup and serve. U can garnish with nuts.
  • When you grind the aval, if u make a fine powder and add it u will end up with Aval Halwa. For this u need to add food colour in the boiling water itself to get uniorm coating.